The Basics of Timelapse photo
Making a timelapse video is not that difficult, all it takes is a (simple) DSLR, even a GoPro, basic editing skills and a lot of time and perseverance. Through this blogpost I hope to clarify the technical aspects of timelapse video production and help you get going!
Utrecht in Motion (2017), my first timelapse film.
"Speeding up the world, one frame at a time."
A common misconception about timelapse videos is that "it's just a sped up video recording" - there's more to it. A timelapse video actually consists of thousands of photo, stitched together to make a video. Technically speaking all videos consist of still images stitched together, displayed at a rate of ~25 frames per second (fps) which we perceive as seemless motion. Video cameras record at 25fps (or 30fps, depending on your region), instantly creating a real-time video.
Most modern cameras also offer recording at higher frame rates, such as 50fps, 96fps, even 120fps and up, allowing time stretching / slow motion video. A 50fps recording allows you to slow down time with a factor of (50/25=) 2, a 120fps recording allows you to slow down time with a factor of (120/25=) 4.8, and so on.
Now, a timelapse video is the opposite of slow-motion. In order to speed up time, you'll have to record at a lower framerate. Actually the recording rate for timelapse videos is so low that we're not talking about a framerate anymore, but rather an interval between pictures. Depending on how long the final timelapse video has to be and how long the process you're capturing takes, you can calculate your interval and the amount of pictures needed. We'll get to that later, at choosing the right interval
1. Project Planning (1 day / ongoing process)
First things first: what's your theme? What do you want to show in your timelapse film, and why? I'll talk about my approach for 'Utrecht in Motion' as an example.
During the time I lived in Utrecht, I started seeing the patterns in daily life, culture and events, student life and tourist attractions within the city. These dynamics in day-to-day life in Utrecht throughout the different seasons was something I wanted to document.
The second aspect that motivated me to make Utrecht in Motion was the contrast between the medieval city centre and rapidly changing skyline around the central railway station. Utrecht's city centre is characterized by medieval buildings - the Dom tower being most prominent and famous of all. Since a few years however, massive construction works have been going around the central railway station as the whole area is being redeveloped. From certain angles, especially at higher altitudes, it's possible to get a beautiful view on this contrast. Just like its citizens, the city itself is in motion - just a slower pace.
2. Gear preparation (1 hour - 1/2 day)
Ideally I'd travel with just a small photo tripod, one camera, one or two lenses and an ND filter. Gradually my setup expanded and now includes a bigger (fluid) tripod head, motorized slider, pan/tilt slider accesories, two - three lenses with anamorphic optics added to it from time to time. To carry all this gear with me without needing a car, I use a GoRuck GR1 backpack. It's not a special camera bag, but it does fit all gear listed below. For most city timelapse films I travel by foot, sometimes I bring my bike. The essentials are highlighted, in case you want to travel more lightweight:
- Sturdy tripod, preferably with a fluid head;
- Camera cage / rig, rails and lens support (for bigger setups);
- Slider + accesories (like rotating / tilting heads);
- Camera + batteries + storage cards;
- Intervalometer, in case your camera has no built-in timelapse function;
- Lenses, preferably primes. Wide angle works great for landscape, urban areas and the nighttime sky;
- ND filters + step up/down rings;
- Laptop to backup footage during the day;
- Waterbottle, sandwiches.
Be sure to charge your batteries the day before, backup and format storage cards, pack your bag and double check if you have packed everything.
3. Recording
Timelapse photo is a great way to visualize slow processes we naturally can't observe in a short time, such as the formation of clouds forming, plants growing, melting ice or moving shadows. Depending on the process you're shooting you can determine the right interval and recording time. This shortlist of common intervals is a good starting point:
Travelling down the road by car 1 second Fast moving clouds, people, traffic 2 seconds Sunset, sunries, ice melting, flowing water 3 seconds Slow moving clouds 4 seconds Sun moving, shadows 20 seconds Stars, milky way 30 seconds Plants growing, construction timelapse 10 minutes Changing seasons 24 hours
Now that the interval is selected, you can calculate how many pictures you need to take in order to create a X seconds clip. For example, I usually stick to 10 second clips when I make a timelapse video of urban areas. This means I need 10 seconds at 25fps = 250 frames. 250 frames at an interval of 2 seconds = 500 seconds, which is roughly 9 minutes.
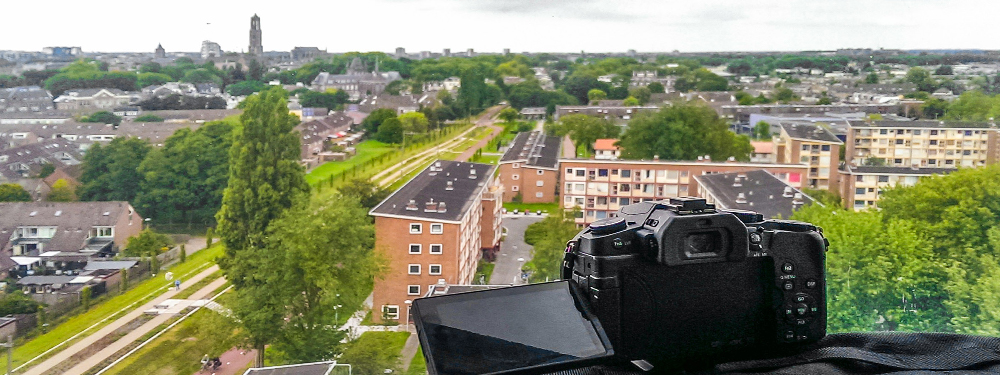
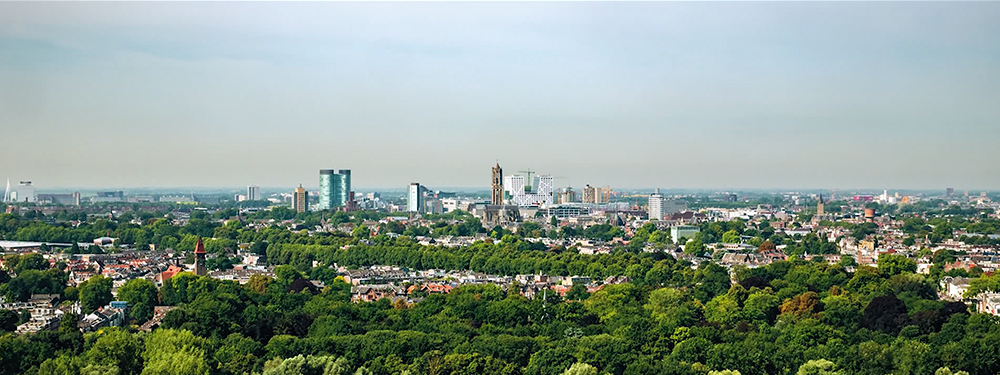
Once you're at the right location it's time to determine your shot. Generally I find that wide angles work really well for timelapse videos, as you'll capture a lot of things going on. If you're somewhere at a higher altitude looking down on a city for example, try using an extreme telelens to zoom in on interesting things going on down below. If you want to create an interesting zoom in post, first record a timelapse with a wide-angle lens, then make the same shot with a telelens and make the transition in post.
Wide-angle shot of the Skyline...

combined with a close-up shot of skyline. Shot from the same location, transitioned in post.
4. Post-production (1 - 2 days for each recording day)
Post-production is divided in a few different stages:
- Offloading footage, mirrored to seperate drives;
- Importing footage in LRTimelapse + editing the footage in Adobe Lightroom
- Creating sequences + applying corrections/effects in Adobe After Effects;
- Creating a film in Adobe Premiere Pro.
1: Offloading footage.
The first stage is offloading the footage to seperate hard drives: one working drive and one backup drive. Make sure to copy from your camera storage to Drive 1, then from your camera storage to Drive 2.
2: LRTimelapse.
The second step is importing the footage in LRTimelapse. LRTimelapse is a great piece of software, designed by Gunther Wegner. The free version is limited to 400 pictures per sequence - but this software is totally worth it if you're serious about producing timelapse videos. If you're enjoying this blogpost, consider getting LRTimelapse through this affiliate link - that way I'll get a small commission.
LRTimelapse generates quick previews of sequences of RAW images, so you quickly get to see what you shot. Then, LRTimelapse lets you set a number of keyframes throughout the sequence. Upon importing the sequence in Adobe Lightroom, you can choose to edit just these keyframes, instead of having to edit the whole sequence. After editing these keyframes, LRTimelapse calculates transitions between these keyframes, including (but not limited to) transitions in exposure, hightlights/shadows and white balance.
Now that the color correction has been applied and transitions have been calculated, LRTimelapse will generate visual previews of your sequences and apply multiple rounds of deflicker. Especially the deflicker function comes in really handy, as flicker is one of the main problems in creating smooth timelapse videos. Generating visual previews and applying multiple rounds of deflicker really takes a while. The good thing is, you can start working on your next sequence while LRTimelapse keeps working on your previous sequence in the background. Naturally, the load on your CPU and GPU will build up.
3: Creating sequences
Once you've gone through all the various stages within LRTimelapse and metadata containing the changes is saved next to the original RAW files, it's time to turn those thousands of photo into videos. Adobe After Effects is a great tool for this, as it lets you import RAW photo as sequences. In After Effects you can apply warp stabilizer to the footage, or apply extra noise removal or deflicker effects from third party plug-ins. Once this is done you can render the seperate shots as video files to import in any video editing software of your choice, incorporate them into regular video projects or send them over to clients.
4: Making a timelapse video.
All previous stages were quite technical - some people might find it boring. In this last stage it's time to really get creative. Finding a good audio track that suits your footage is always a good starting point, import your shots into your favorite video editing software and start the magic! Be sure to apply some 'camera movement' in post; very slight zooms help to direct the viewers focus to specific areas. Be gentle though, as timelapse videos speak for themselves.